Internationalization và Localization trong Java
Internationalization và Localization trong Java là một kỹ thuật mà người học cần phải biết để tạo được ứng dụng có thể tương tích với một khu vực cụ thể hơn.
Vậy Internationalization và Localization bắt đầu từ đâu? Hãy tìm hiểu với R2S nhé!
Internationalization và Localization trong Java là gì?
Internationalization và Localization trong Java được hiểu với 2 định nghĩa như sau:
- Internationalization (quốc tế hoá) có thể được viết tắt là i18n do có 18 ký tự ở giữa I và N. Đây là kỹ thuật cho phép tạo ứng dụng có thể sử dụng nhiều ngôn ngữ và khu vực khác nhau.
- Localization (nội địa hoá) còn được viết tắt là l10n do có 10 ký tự ở giữa L và N. Đây là kỹ thuật giúp ứng dụng thích ứng với một ngôn ngữ và vùng miền cụ thể.
Vì vậy, một ứng dụng hỗ trợ đa ngôn ngữ được gọi là Internationalization (quốc tế hoá), trong khi khi người dùng chọn một ngôn ngữ cụ thể để hiển thị thì được gọi là Localization (nội địa hoá).
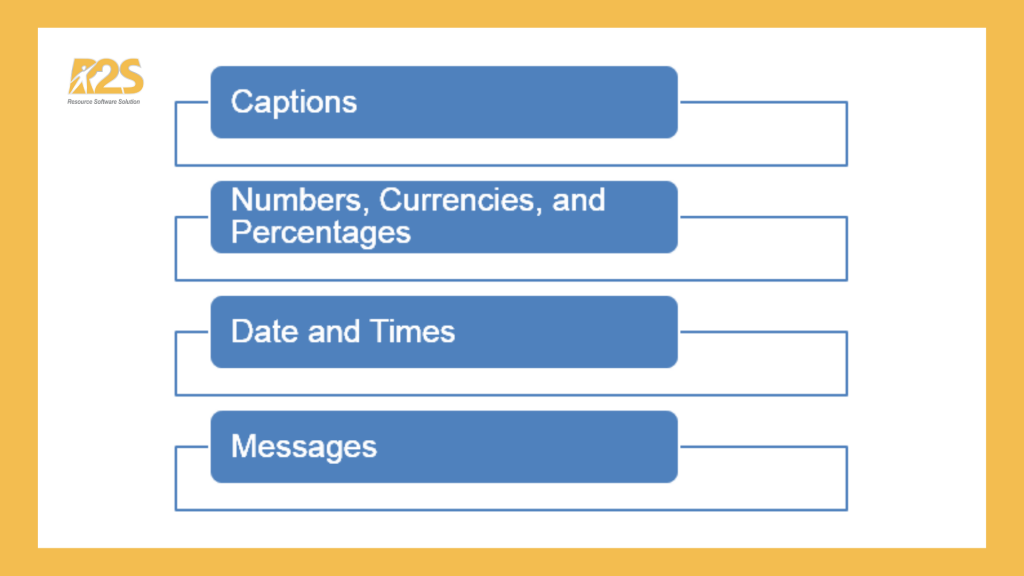
Các thành phần trong ứng dụng cần được quốc tế hóa

Quốc tế hoá các thông điệp (Messages) trong Java như thế nào?
Chúng ta có thể sử dụng lớp ResourceBundle để xử lý quốc tế hoá cho các message trong ứng dụng. Việc khai báo các message được thực hiện trong tập tin properties thay vì được viết cứng trong code.
Tên của tập tin properties được đặt theo qui tắc filename_languagecode_countrycode với filename là tên tập tin, languagecode là mã ngôn ngữ và countrycode là mã quốc gia.
Dưới đây là bảng mô tả language code và country code cho từng quốc gia.
| Tên quốc gia (Tiếng Anh) | Language Code (Mã ngôn ngữ) | Country Code (Mã quốc gia) |
| English | en | EN |
| Germany | de | DE |
| China | zh | CN |
| Czech Republic | cs | CZ |
| Netherlands | nl | AN |
| France | fr | FR |
| Italy | it | IT |
| Japan | ja | JP |
| Korea | ko | KR |
| Russia | ru | RU |
| Spain | es | ES |
| Bulgaria | bg | BG |
| Canada | ca | CA |
| Croatia | hr | HR |
| Denmark | da | DK |
| Finland | fi | FI |
| Greece | el | GR |
| Hungary | hu | HU |
| Indonesia | in | ID |
| Latvia | lv | LV |
| Lithuania | lt | LT |
| Norway | nb | NO |
| Portugal | pt | PT |
| Romania | ro | RO |
| Serbia | sr | RS |
| Slovakia | sk | SK |
| Slovenia | sl | SI |
| Sweden | sv | SE |
| Thailand | th | TH |
| Turkey | tr | TR |
| Ukraine | uk | UA |
| Vietnam | vi | VN |
Ví dụ với Internationalization và Localization trong Java
Để tạo chương trình hiển thị chuỗi “Hello World” và “Xin chào thế giới!” tùy thuộc vào lựa chọn của người dùng là tiếng Anh hay tiếng Việt, ta có thể thực hiện các bước sau:
Bước 1: Tạo 2 tập tin properties tương ứng 2 ngôn ngữ muốn hiển thị
- Tạo tập tin MessageBundle_en_US
- Click chuột phải vào project hoặc package
- Chọn New
- Chọn Properties File
- Nhập tên tập tin tại File Name
- Chọn Finish
Nhập nội dung cho tập tin MessageBundle_en_US
#key = value
greeting = Hello World!
Tạo tập tin MessageBundle_vi_VN và nhập nội dung sau
greeting = Xin chào thế giới!Lưu ý key trong các tập tin phải giống nhau, các tập tin này chỉ khác nhau về value. Mỗi value tương ứng cho một ngôn ngữ.
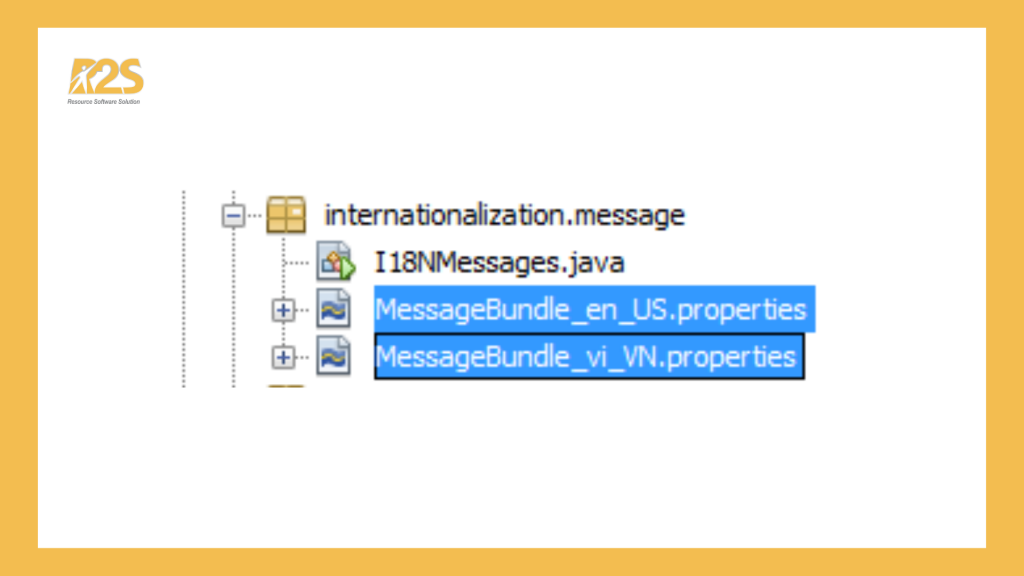
Hình bên dưới cho biết hai tập tin properties được lưu trong packge tên internationalization.message
Bước 2: Tạo lớp I18NMessages và cài đặt xử lý
package internationalization.message;

import java.util.Locale;
import java.util.ResourceBundle;
import java.util.Scanner;

/**
 *
 * @author giasutinhoc.vn
 */
public class I18NMessages {
 public static void main(String[] args) {
   int lang;
   Scanner s = new Scanner(System.in);
   ResourceBundle bundle;

   do {
    System.out.println("1. English");
    System.out.println("2. Vietnamese");
    System.out.println("3. Exit program");

    System.out.print("Please choose your language: ");
    lang = s.nextInt();

    switch (lang) {
     case 1:
       //internationalization.message is package name
       //MessageBundle is properties file name
       bundle = ResourceBundle.getBundle("internationalization.message.MessageBundle", Locale.US);
       System.out.println("Message in " + Locale.US
                                + ": " + bundle.getString("greeting"));
       break;
     case 2:
       //changing the default locale to Vietnamese
       Locale.setDefault(new Locale("vi", "VN"));
       bundle = ResourceBundle.getBundle("internationalization.message.MessageBundle");
       System.out.println("Message in " + Locale.getDefault()
                                + ": " + bundle.getString("greeting"));
       break;
    }
   } while (lang != 3);
 }
}
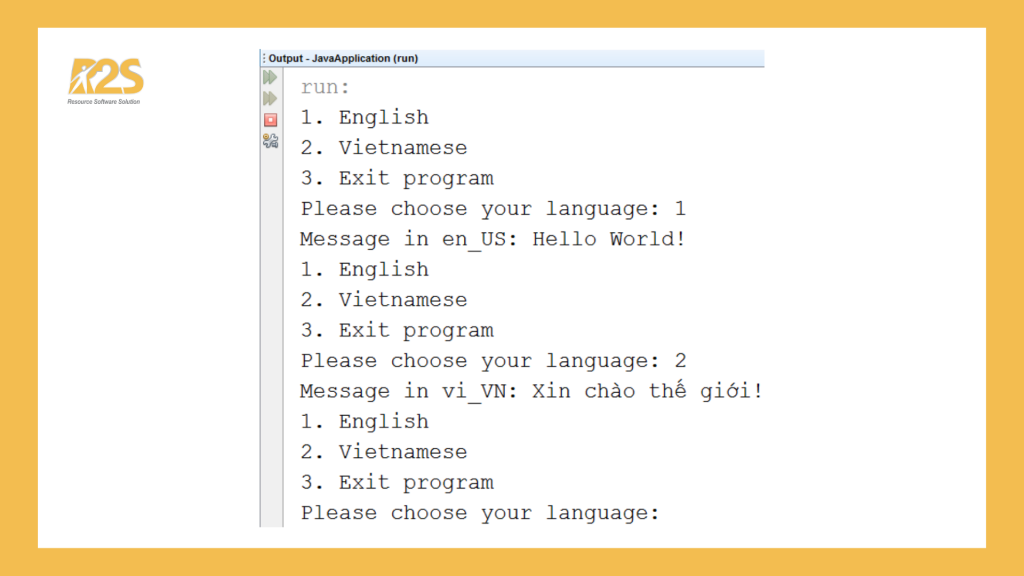
Bước 3: Nhận kết quả
Quốc tế hoá ngày (Date) trong java như thế nào?
Chúng ta có thể quốc tế hoá ngày bằng cách sử dụng phương thức getDateInstance() của lớp DateFormat. Phương thức này có thể nhận vào 2 tham số: style và locale. Các kiểu style bao gồm DEFAULT, SHORT và LONG.
Ví dụ
Ví dụ về hiển thị ngày hiện tại theo những vùng miền khác nhau như JP và VN như sau:
package internationalization;

import java.text.DateFormat;
import java.util.Date;
import java.util.Locale;
import java.util.Scanner;

/**
 *
 * @author giasutinhoc.vn
 */
public class I18NDate {

 private static void printDate(Locale locale) {
   DateFormat formatter = DateFormat.getDateInstance(DateFormat.LONG,
                                                               locale);
   Date currentDate = new Date();
   String date = formatter.format(currentDate);
   System.out.println(locale + " : " + date);
 }

 public static void main(String[] args) {
   int region;
   Scanner s = new Scanner(System.in);

   do {
     System.out.println("1. Japan");
     System.out.println("2. Vietnam");
     System.out.println("3. Exit program");

     System.out.print("Please choose your region: ");
     region = s.nextInt();

     switch (region) {
       case 1:
          printDate(Locale.JAPAN);
          break;
       case 2:
          printDate(new Locale("vi", "VN"));
          break;
     }
   } while (region != 3);
 }
}
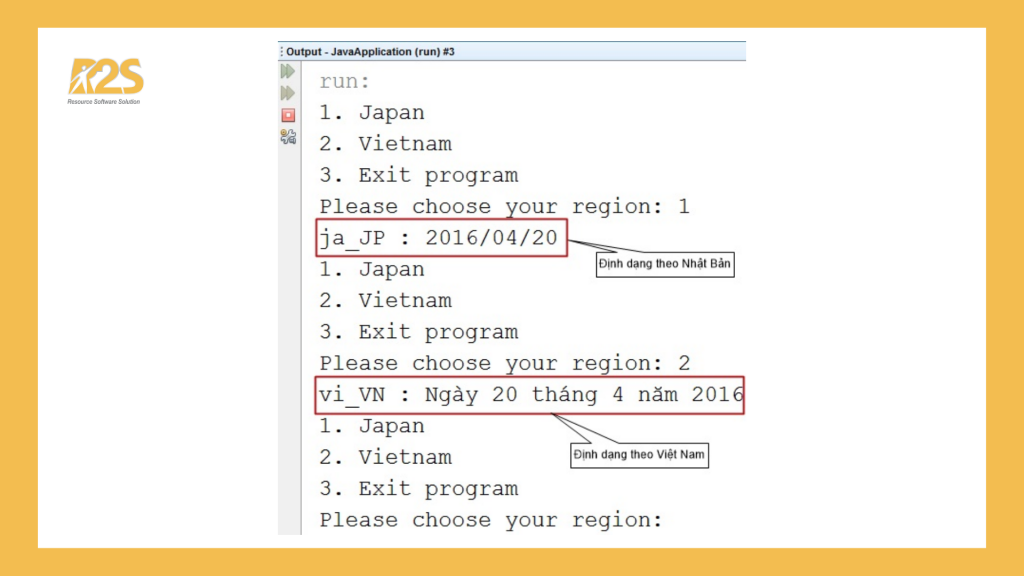
Kết quả khi chạy chương trình
Quốc tế hoá thời gian (Time) – Internationalization và localization trong Java
Chương trình sẽ hiển thị thời gian hiện tại dựa theo vùng miền được chỉ định theo ví dụ cụ thể sau:
package internationalization;

import java.text.DateFormat;
import java.util.Date;
import java.util.Locale;
import java.util.Scanner;

/**
 *
 * @author giasutinhoc.vn
 */
public class I18NTime {
 static void printTime(Locale locale) {
   DateFormat formatter = DateFormat.getTimeInstance(DateFormat.LONG, locale);
   Date currentDate = new Date();
   String time = formatter.format(currentDate);
   System.out.println(time + " in locale: " + locale);
 }

 public static void main(String[] args) {
   int region;
   Scanner s = new Scanner(System.in);

   do {
    System.out.println("1. England");
    System.out.println("2. Vietnam");
    System.out.println("3. Exit program");

    System.out.print("Please choose your region: ");
    region = s.nextInt();

   switch (region) {
    case 1:
      printTime(Locale.ENGLISH);
      break;
    case 2:
      printTime(new Locale("vi", "VN"));
      break;
   }
  } while (region != 3);
 }
}
package internationalization;
import java.text.DateFormat;
import java.util.Date;
import java.util.Locale;
import java.util.Scanner;
/**
*
* @author giasutinhoc.vn
*/
public class I18NTime {
static void printTime(Locale locale) {
DateFormat formatter = DateFormat.getTimeInstance(DateFormat.LONG, locale);
Date currentDate = new Date();
String time = formatter.format(currentDate);
System.out.println(time + " in locale: " + locale);
}
public static void main(String[] args) {
int region;
Scanner s = new Scanner(System.in);
do {
System.out.println("1. England");
System.out.println("2. Vietnam");
System.out.println("3. Exit program");
System.out.print("Please choose your region: ");
region = s.nextInt();
switch (region) {
case 1:
printTime(Locale.ENGLISH);
break;
case 2:
printTime(new Locale("vi", "VN"));
break;
}
} while (region != 3);
}
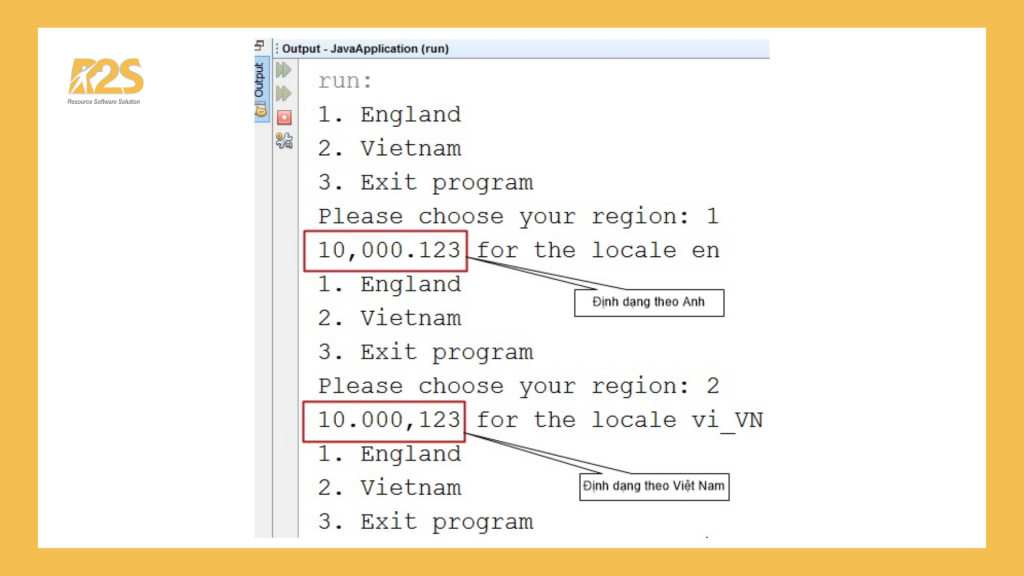
}Kết quả khi chạy chương trình
Internationalization và localization trong Java – Quốc tế hoá số (Number)
Cài đặt ví dụ
package internationalization;

import static internationalization.I18NTime.printTime;
import java.text.NumberFormat;
import java.util.Locale;
import java.util.Scanner;

/**
 *
 * @author giasutinhoc.vn
 */

public class I18NNumber {

 private static void printNumber(Locale locale) {

   double n = 10000.12345;

   NumberFormat formatter = NumberFormat.getNumberInstance(locale);
   String number = formatter.format(n);

   System.out.println(number + " for the locale " + locale);
 }

 public static void main(String[] args) {

   int region;
   Scanner s = new Scanner(System.in);

   do {
     System.out.println("1. England");
     System.out.println("2. Vietnam");
     System.out.println("3. Exit program");

     System.out.print("Please choose your region: ");
     region = s.nextInt();

     switch (region) {
       case 1:
         printNumber(Locale.ENGLISH);

         break;

       case 2:
         printNumber(new Locale("vi", "VN"));

         break;
     }
    } while (region != 3);
 }
}
Kết quả khi chạy chương trình
Internationalization và localization trong Java – Quốc tế hoá tiền tệ (Currency)
package internationalization;

import java.text.NumberFormat;
import java.util.Locale;
import java.util.Scanner;

/**
 *
 * @author giasutinhoc.vn
 */
public class I18NCurrency {

 private static void printCurrency(Locale locale) {
   float n = 10500.3245F;
   NumberFormat formatter = NumberFormat.getCurrencyInstance(locale);

   String currency = formatter.format(n);
   System.out.println(currency + " for the locale " + locale);
 }

 public static void main(String[] args) {
   int region;
   Scanner s = new Scanner(System.in);

   do {
     System.out.println("1. Japan");
     System.out.println("2. Vietnam");
     System.out.println("3. Exit program");

     System.out.print("Please choose your region: ");
     region = s.nextInt();

     switch (region) {
       case 1:
          printCurrency(Locale.JAPAN);
          break;
       case 2:
          printCurrency(new Locale("vi", "VN"));
          break;
     }
   } while (region != 3);
 }
}
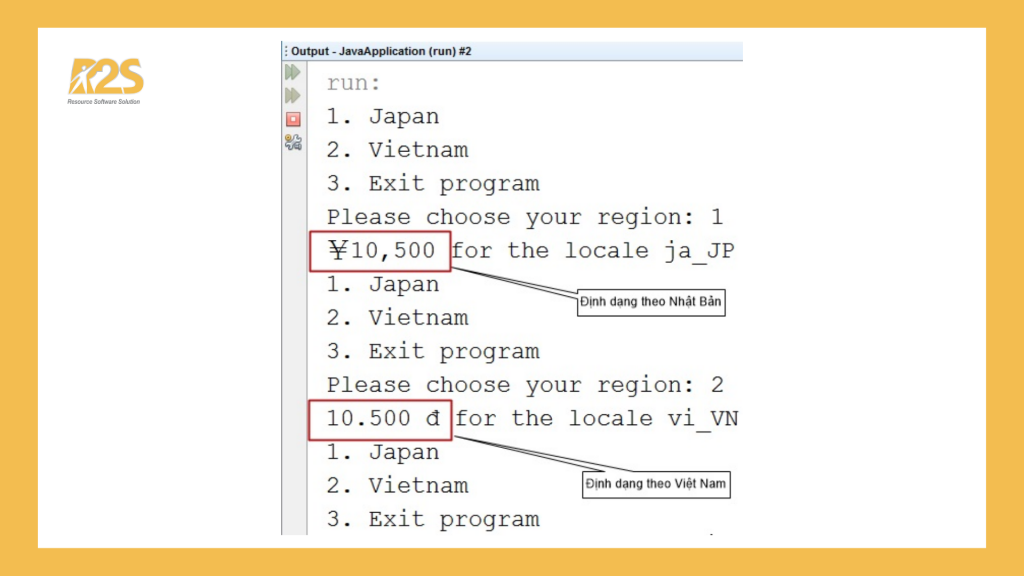
Kết quả sau chạy chương trình
Kết luận
Như vậy trên đây, R2S chúng tôi đã giúp các bạn hiểu về Internationalization và localization trong Java là gì, cũng như các bước quốc tế hoà thông điệp, quốc tế hoá ngày, thời gian, số và tiền tệ vô cùng hiệu quả.
Chúc bạn học vui và đừng bỏ lỡ những bài học tiếp theo của chúng tôi về lập trinh C, Android, IOS nhé!
Bài viết gốc được đăng tại: giasutinhoc.vn

