Lưu trữ dữ liệu trong Android
Lưu trữ dữ liệu trong Android
Lưu trữ dữ liệu trong Android là một khía cạnh mà những đối tượng đang học về lập trình Android nhất định phải biết.
Để tìm hiểu các hình thức và đặc điểm của lưu trữ dữ liệu vào bộ nhớ trong, lưu trữ dữ liệu vào bộ nhớ ngoài, với shared preferences… Hãy cùng theo dõi ngay bài viết dưới đây của R2S nhé!
Lưu trữ dữ liệu trong Android là gì?

Lưu trữ dữ liệu trong Android vô cùng quan trọng. Bởi người lập trình sẽ phải hiểu về các lựa chọn trong việc lưu trữ dữ liệu khác nhau như thế nào và sử dụng như thế nào cho phù hợp.
Phân loại lưu trữ dữ liệu trong android
Hiện nay có các phân loại lưu trữ dữ liệu trong Android như sau:
- Lưu trữ dữ liệu vào bộ nhớ trong (internal storage),
- Lưu trữ dữ liệu vào bộ nhớ ngoài (external storage)
- Lưu trữ dữ liệu với shared preferences
- Lưu trữ dữ liệu sử dụng SQLite
- Lưu trữ dữ liệu thông qua mạng (storage via network connection)
Dưới đây, chúng ta hãy cùng tìm hiểu những thông tin cơ bản về mỗi loại mà bạn cần biết
Lưu trữ dữ liệu vào bộ nhớ trong (Internal Storage)
Internal storage là nơi lưu trữ dữ liệu cục bộ theo từng ứng dụng trên bộ nhớ trong. Dữ liệu sẽ bị mất khi người dùng xoá ứng dụng.
Để ghi dữ liệu vào bộ nhớ trong, bạn có thể sử dụng phương thức FileWriter với tham số là đường dẫn và tên tập tin (FileName) mà bạn muốn tạo, sau đó sử dụng phương thức write() để ghi dữ liệu vào (str là dữ liệu bạn cần ghi vào bộ nhớ). Dữ liệu này có thể được lấy từ giao diện của ứng dụng.
OutputStream os = openFileOutput("FileName", MODE_APPEND/MODE_PRIVATE);
String str = "Dữ liệu cần ghi";
os.write(str.getBytes());
os.close();
Xử lý đọc dữ liệu từ bộ nhớ trong (Lưu ý, FileName là tên tập tin mà chúng ta cần đọc dữ liệu)
FileInputStream fis = openFileInput("fileName");
BufferedReader br = new BufferedReader(new InputStreamReader(fis));
StringBuffer data = new StringBuffer();
String line = "";
while ((line = br.readLine()) != null) {
 data. append(line).append("\n");
}
Lưu trữ dữ liệu vào bộ nhớ ngoài (External Storage)
Tương tự như bộ nhớ trong (internal storage), chúng ta có thể lưu và đọc dữ liệu từ bộ nhớ ngoài của thiết bị như SD Card.
Để ghi dữ liệu vào bộ nhớ ngoài, ta cần sử dụng các quyền truy cập bộ nhớ ngoài trong file AndroidManifest.xml.
Sau đó, ta có thể sử dụng phương thức FileWriter với tham số là đường dẫn và tên tập tin (fileName) cần tạo, sau đó sử dụng phương thức write() để ghi dữ liệu vào (dữ liệu này có thể lấy từ giao diện của ứng dụng).
File sdcard = Environment.getExternalStorageDirectory();
File file = new File(sdcard,"FileName");
OutputStream os = new FileOutputStream(file);
String str = "Dữ liệu muốn ghi";
os.write(str.getBytes());
os.close();
Xử lý đọc dữ liệu từ bộ nhớ ngoài
File sdcard = Environment.getExternalStorageDirectory();
File file = new File(sdcard,"FileName");
BufferedReader br = new BufferedReader(new FileReader(file));
String line;
//Đọc dữ liệu từ file, nội dung sau khi đọc sẽ chứa trong biến content
StringBuilder content = new StringBuilder();
while ((line = br.readLine()) != null) {
 content.append(line);
 content.append('\n');
}
br.close();
Lưu trữ dữ liệu trong android – Ví dụ
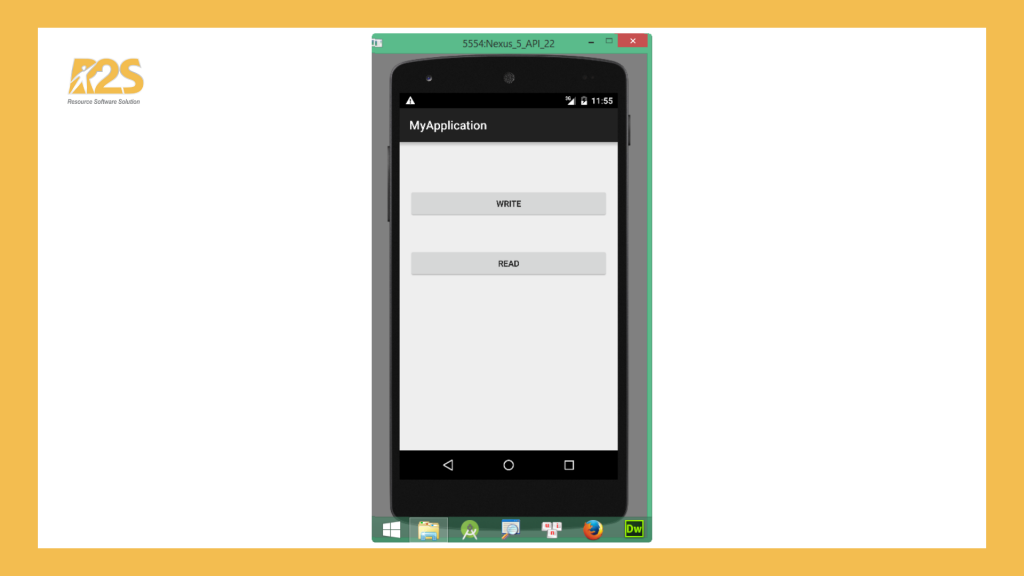
Giao diện màn hình thứ nhất như sau:
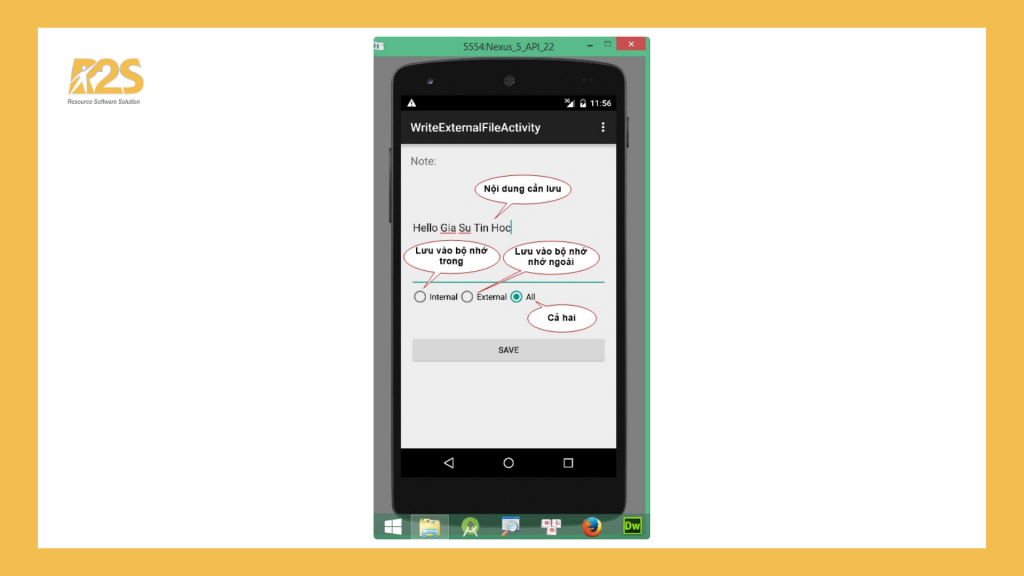
Giao diện màn hình thứ hai được gọi khi người dùng click vào nút “WRITE”
Giao diện màn hình thứ ba sẽ được gọi khi người dùng click vào nút “READ”
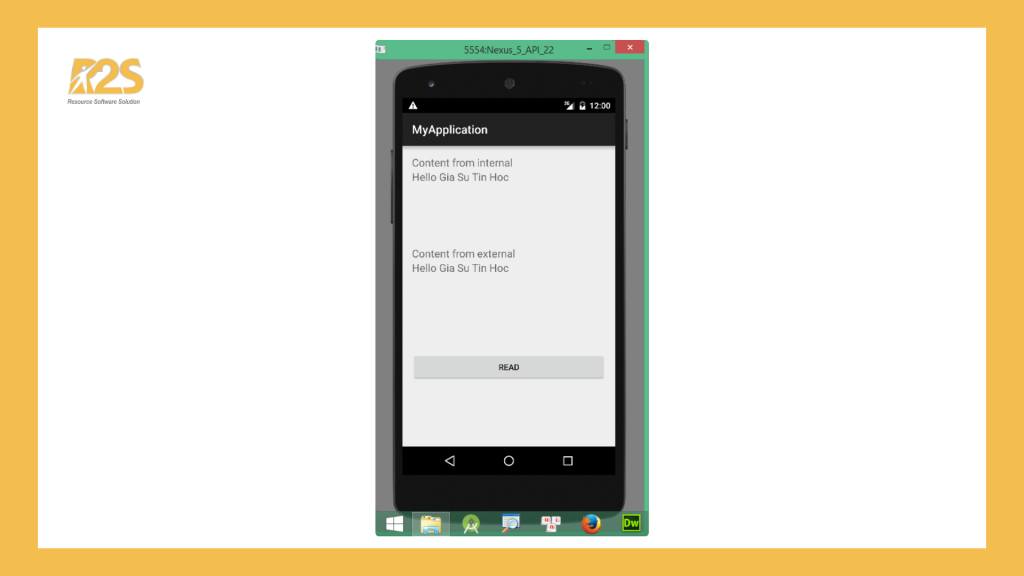
Các bước thực hiện bao gồm:
- Bước 1: Tạo 3 activity đặt tên lần lượt là DataStorageDemoActivity, WrittingFileActivity và ReadingFileActivity
- Bước 2: Thiết kế giao diện
Giao diện DataStorageDemoActivity
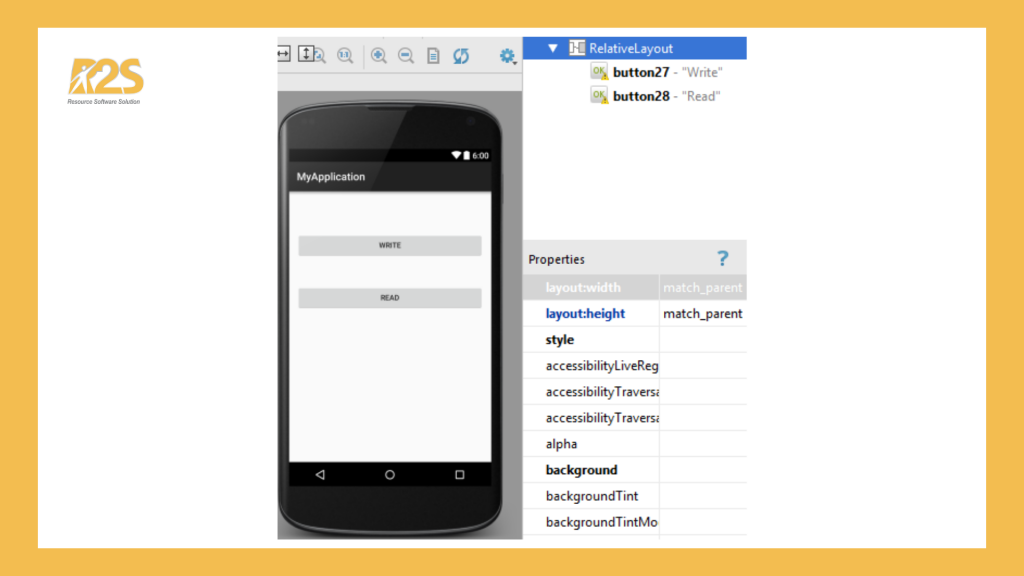
Giao diện WrittingFileActivity
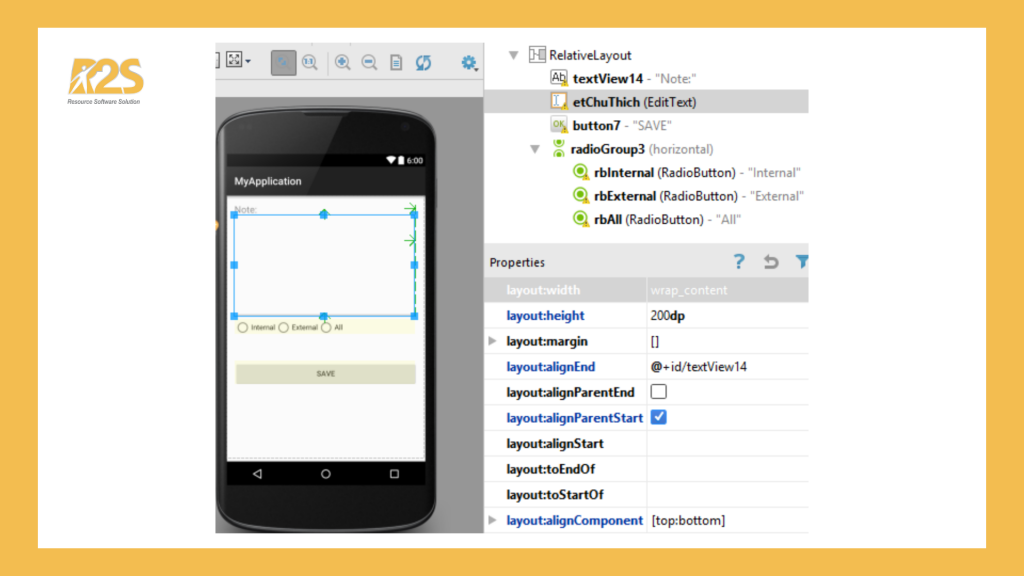
Giao diện ReadingFileActivity
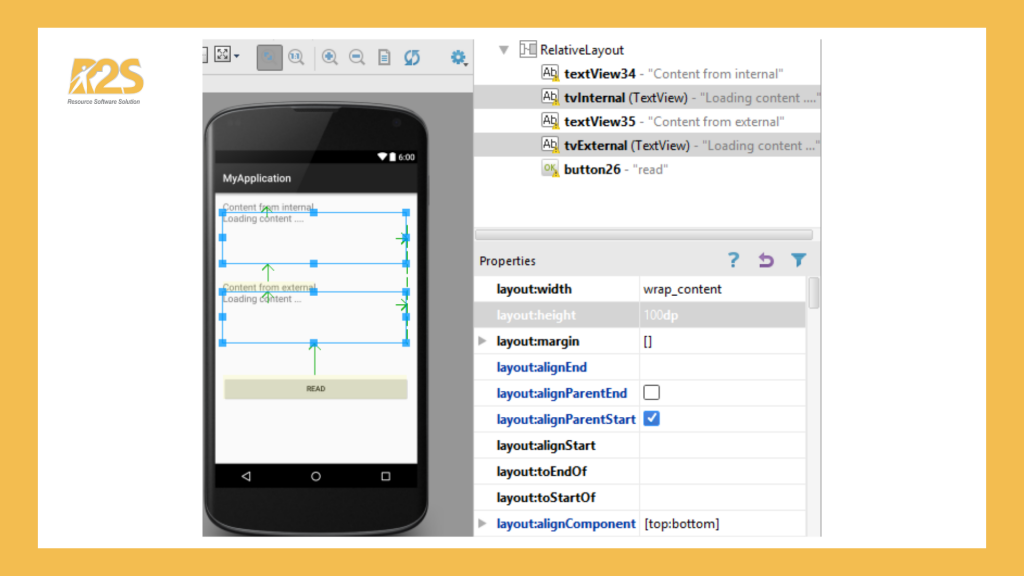
- Bước 3: Viết xử lý sự kiện (Lưu ý chỉnh định tên phương thức trong thuộc tính onClick của các button trong layout)
Code của DataStorageDemoActivity
public class WrittingFileActivity extends AppCompatActivity {
    EditText etChuThich;
    RadioButton rbInternal, rbExternal;
    @Override
    protected void onCreate(Bundle savedInstanceState) {
        super.onCreate(savedInstanceState);
        setContentView(R.layout.activity_writting_file);
        etChuThich = (EditText) findViewById(R.id.etChuThich);
        rbInternal = (RadioButton) findViewById(R.id.rbInternal);
        rbExternal = (RadioButton) findViewById(R.id.rbExternal);
    }
    public void writeExternal(View view) {
        try {
            if (rbInternal.isChecked()) {
                writeInternal();
            } else if (rbExternal.isChecked()) {
                writeExternal();
            } else {
                writeInternal();
                writeExternal();
            }
            Toast.makeText(this, "Ghi dữ liệu thành công!", Toast.LENGTH_SHORT).show();
        } catch (Exception e) {
        }
    }
    public void writeInternal() {
        try {
            OutputStream os = openFileOutput("chuthich_in.txt", MODE_PRIVATE);
            String string = etChuThich.getText().toString();
            os.write(string.getBytes());
            os.close();
        } catch (Exception e) {
        }
    }
    public void writeExternal() {
        try {
            File sdcard = Environment.getExternalStorageDirectory();
            File f = new File(sdcard,"chuthich_ex.txt");
            OutputStream os = new FileOutputStream(f);
            String string = etChuThich.getText().toString();
            os.write(string.getBytes());
            os.close();
        } catch (Exception e) {
        }
    }
}
Code của WrittingFileActivity
public class ReadingFileActivity extends AppCompatActivity {
    TextView tvInternal, tvExternal;
    @Override
    protected void onCreate(Bundle savedInstanceState) {
        super.onCreate(savedInstanceState);
        setContentView(R.layout.activity_reading_file);
        tvInternal = (TextView)findViewById(R.id.tvInternal);
        tvExternal = (TextView)findViewById(R.id.tvExternal);
    }
    public void load(View view){
        readFromInternal();
        readFromExternal();
    }
    private void readFromInternal(){
        try {
            InputStream is = openFileInput("chuthich_in.txt");
            int size = is.available();
            byte data[] = new byte[size];
            is.read(data);
            is.close();
            String s = new String(data); //s chứa dữ liệu đọc từ file
            tvInternal.setText(s);
        }catch (Exception ex){
        }
    }
    private void readFromExternal(){
        try {
            File sdcard = Environment.getExternalStorageDirectory();
            File f = new File(sdcard,"chuthich_ex.txt");
            BufferedReader br = new BufferedReader(new FileReader(f));
            String line;
            //Read text from file
            StringBuilder content = new StringBuilder();
            while ((line = br.readLine()) != null) {
                content.append(line);
                content.append('\n');
            }
            br.close();
            tvExternal.setText(content);
        }catch (Exception ex){
        }
    }
}
Code của ReadingFileActivity
public class ReadingFileActivity extends AppCompatActivity {
    TextView tvInternal, tvExternal;
    @Override
    protected void onCreate(Bundle savedInstanceState) {
        super.onCreate(savedInstanceState);
        setContentView(R.layout.activity_reading_file);
        tvInternal = (TextView)findViewById(R.id.tvInternal);
        tvExternal = (TextView)findViewById(R.id.tvExternal);
    }
    public void load(View view){
        readFromInternal();
        readFromExternal();
    }
    private void readFromInternal(){
        try {
            InputStream is = openFileInput("chuthich_in.txt");
            int size = is.available();
            byte data[] = new byte[size];
            is.read(data);
            is.close();
            String s = new String(data); //s chứa dữ liệu đọc từ file
            tvInternal.setText(s);
        }catch (Exception ex){
        }
    }
    private void readFromExternal(){
        try {
            File sdcard = Environment.getExternalStorageDirectory();
            File f = new File(sdcard,"chuthich_ex.txt");
            BufferedReader br = new BufferedReader(new FileReader(f));
            String line;
            //Read text from file
            StringBuilder content = new StringBuilder();
            while ((line = br.readLine()) != null) {
                content.append(line);
                content.append('\n');
            }
            br.close();
            tvExternal.setText(content);
        }catch (Exception ex){
        }
    }
}
Thực hành lưu trữ dữ liệu trong android
Bài thực hành số 1:
Thiết kế giao diện ứng dụng
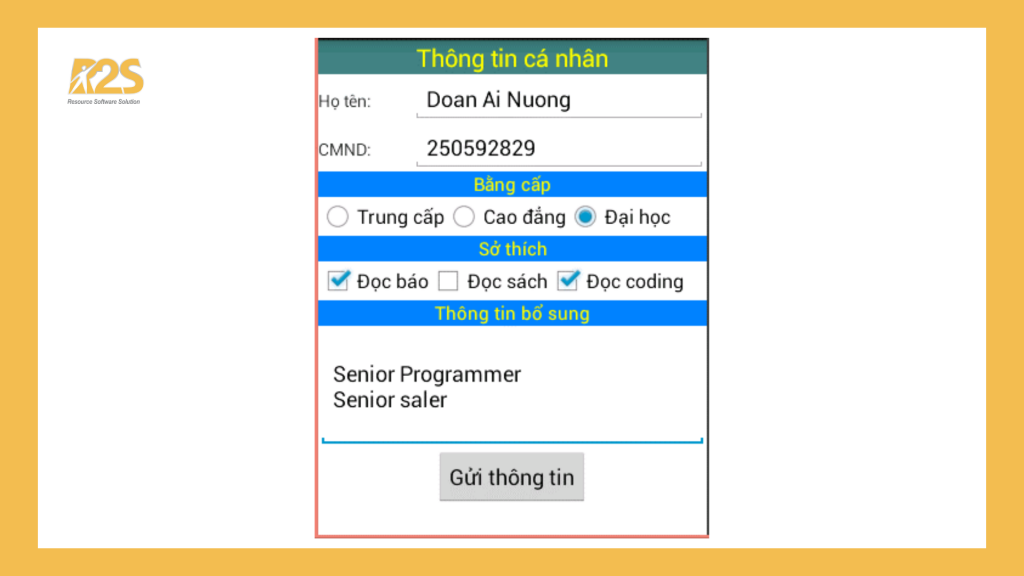
Viết xử lý cho nút “Gửi thông tin”
Kiểm tra thông tin
- Họ tên không được để trống và phải có ít nhất 3 ký tự
- Chứng minh nhân dân chỉ được nhập kiểu số và phải có đúng 9 chữ số
- Bằng cấp mặc định sẽ chọn là Đại học
- Sở thích phải chọn ít nhất 1
- Nếu thông tin hợp lệ, ứng dụng sẽ lưu thông tin vào bộ nhớ (trong hoặc ngoài)
Lưu trữ dữ liệu trong android – Shared Preferences
Shared Preferences cho phép chúng ta lưu và đọc dữ liệu bằng cặp key/value. Để sử dụng shared preferences, chúng ta gọi phương thức getSharedPreferences() với cú pháp như sau:
SharedPreferences sp = getSharedPreferences(“FileName”, Mode);
Bảng sau đây mô tả về Mode
| STT | Miêu tả |
| 1 | MODE_APPEND có nghĩa là nối các preferences mới với các preferences đã tồn tại. |
| 2 | MODE_PRIVATE có nghĩa là chỉ cho phép truy cập cục bộ. |
| 3 | MODE_WORLD_READABLE cho phép ứng dụng khác đọc preferences. |
| 4 | MODE_WORLD_WRITEABLE cho phép ứng dụng khác ghi preferences. |
viết lại: Để lưu vào shared preferences, chúng ta sử dụng lớp SharedPreferences.Editor. Lớp này cho thao tác dữ liệu bên trong shared preferences.
Bảng sau sẽ trình bày các phương thức của lớp SharedPreferences.Editor.
| STT | Tên gọi | Miêu tả |
| 1 | commit() | Lưu các thay đổi từ editor vào sharedPreference. |
| 2 | clear() | Xóa toàn bộ dữ liệu trong editor. |
| 3 | remove(String key) | Xóa dữ liệu dựa trên key trong editor. |
| 4 | putLong(String key, long value) | Lưu dữ liệu kiểu long trong editor. |
| 5 | putInt(String key, int value) | Lưu dữ liệu kiểu int trong editor. |
| 6 | putFloat(String key, float value) | Lưu dữ liệu kiểu float trong editor. |
Xử lý ghi dữ liệu – Lưu trữ dữ liệu trong Android
//Tạo đối tượng SharedPreferences
SharedPreferences sp = getSharedPreferences("FileName", Mode);
SharedPreferences.Editor editor = sp.edit();
//Lưu dữ liệu
editor.putX(key, value); //X là kiểu dữ liệu
//Hoàn thành
editor.commit();
Xử lý đọc dữ liệu
//Tạo đối tượng SharedPreferences
SharedPreferences sp = getSharedPreferences("FileName", Mode);
//Đọc dữ liệu
sp.getX(key, default); //X là kiểu dữ liệu
Bài thực hành số 2
Thiết kế và code cho màn hình đăng nhập (LoginActivity). Nếu người dùng chọn “Remember”, thông tin đăng nhập sẽ được lưu lại để sử dụng cho lần đăng nhập tiếp theo.
Giao diện ứng dụng
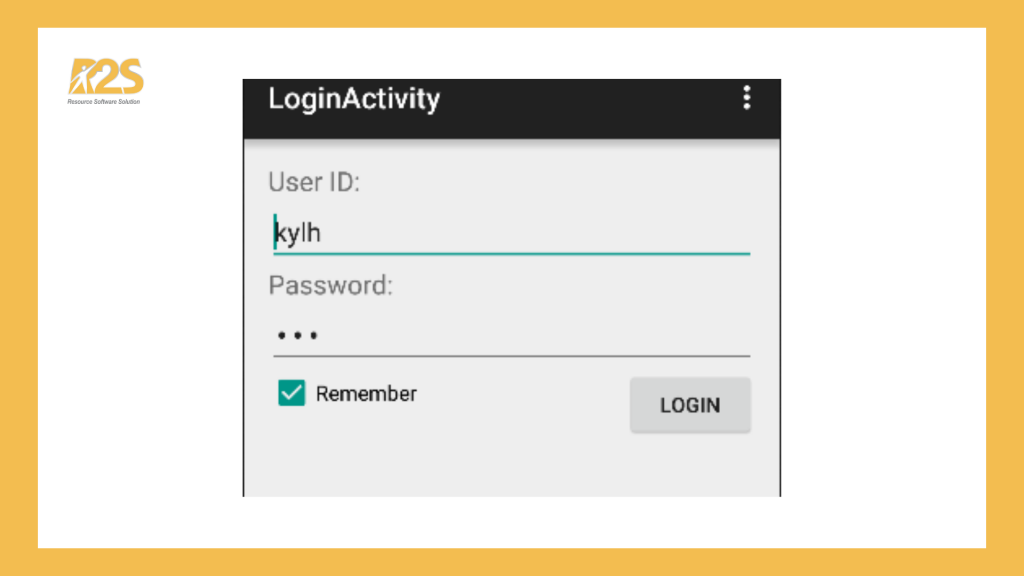
Nếu người dùng click vào nút “LOGIN” và chọn Remember, thông tin đăng nhập sẽ được lưu vào shared preferences.
Kết luận
Như vậy, trong bài viết trên đây, chúng tôi đã hướng dẫn các bạn cách thực hiện lưu trữ vào bộ nhớ ngoài (external storage), lưu trữ dữ liệu với shared preferences, lưu trữ dữ liệu sử dụng SQLite hoặc lưu trữ dữ liệu thông qua mạng (storage via network connection) vô cùng chi tiết.
Hãy học lập trình vui và đừng quên theo dõi những bài viết tiếp theo của chúng tôi nhé!
Bài viết gốc được đăng tại: giasutinhoc.vn


